Installing and configuring OpenDJ
Downloading OpenDJ
OpenDJ is an open source, LDAPv3 compliant directory server.
Built on the Java platform, it provides a high performance, highly scalable, available and secure store for the identities managed by enterprises and service providers.
OpenDJ is the pillar of ForgeRock I3 Open platform, an open source identity oriented middleware solution powering thousands of the world's largest companies and government organizations.
You can find more information about OpenDJ and ForgeRock at www.forgerock.com.
First you have to download and install OpenDJ from Forgerock.
For this tutorial we have downloaded and installed version 2.4.5 using the QuickSetup format from http://www.forgerock.org/opendj.html
Installation
For a complete documentation on how-to install OpenDJ on your server, please refer to the Installation guide.
Using the QuickSetup you have a graphical front-end to configure your LDAP server. In a real environment you will probably use a fully qualified name (myldap.company.com) for your server.
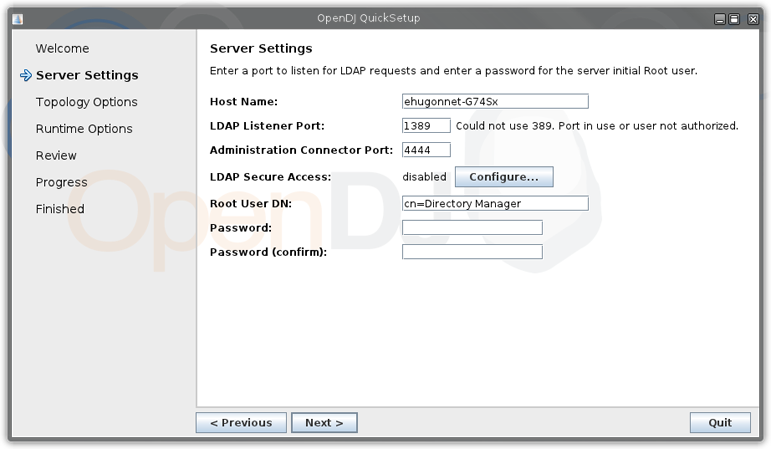
We leave all the default settings.
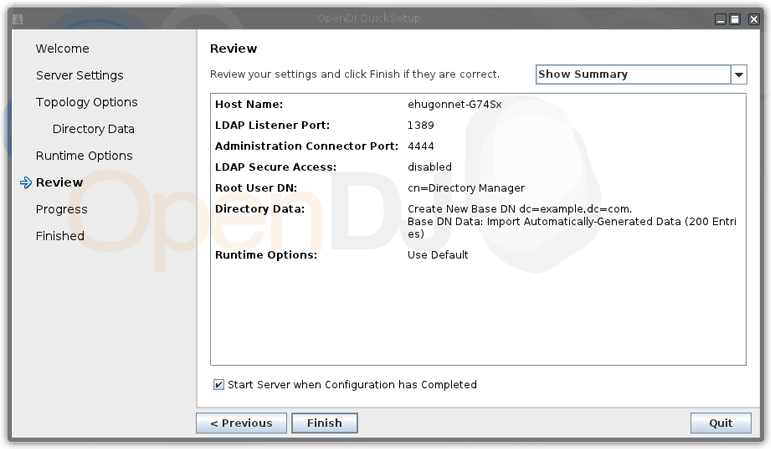
Adding some data
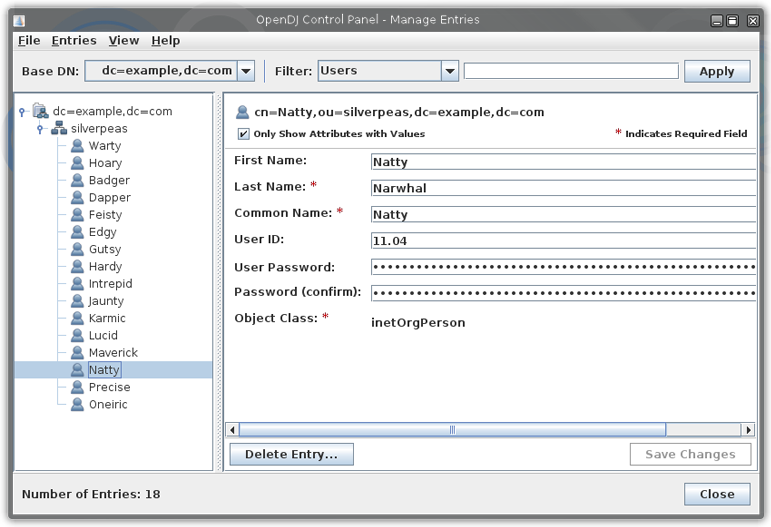
Let's create some users in the OpenDJ server using OpenDJ's console. If you haven't launch it after the installation process, go to OpenDJ's installation directory. You'll find all the scripts under the bin directroy. To launch the administration console, launch the control-panel script.
Now click the Manage Entries menu item on the left. And create a Silverpeas organizationnal unit.
Add some users to it so we will synchronize some data.
We provide a ldif file to facilitate these operations using the following command :
import-ldif -a -n userRoot -l <fichierLDIF> -h localhost -p 4444 -X -D "cn=directory manager" -w password
What is a Domain ?
Silverpeas users and groups management is based on Domains. You can create as much domains as you want, each with its own storage type or configuration.
Each domain is configured using properties files, let's look at them on the next section.
Configuring the domain synchronization
Configuring the connection
First we need a configuration file to define how to connect to the LDAP server and how to synchronize it with Silverpeas.
You would have to create a new domainOpenDJTutorial.properties into $SILVERPEAS_HOME/properties/org/silverpeas/domains.
As it happens, you don't have to write this configuration file as it is provided with a default Silverpeas installation.
The first section is the configuration of the connection. You'll find the port and the address of the server, the user account used to open connections to the LDAP server and the Base DN.
database.LDAPHost=localhost
# if you are using MS Active Directory, set 'ad' on parameter below
database.LDAPImpl=openldap
database.LDAPPort=1389
database.LDAPProtocolVer=3
database.LDAPAccessLoginDN=cn=Directory Manager,cn=Root DNs,cn=config
database.LDAPAccessPasswd=password
database.LDAPUserBaseDN=ou=silverpeas,dc=example,dc=com
database.LDAPSecured=false
database.LDAPPortSecured=636
# !!! Client Time in MS !!!
database.LDAPMaxMsClientTimeLimit=0
# !!! Server Time in Seconds !!!
database.LDAPMaxSecServerTimeLimit=0
database.LDAPMaxNbEntryReturned=1000
database.LDAPMaxNbReferrals=0
database.LDAPBatchSize=1000
database.LDAPSearchRecurs=true
#To be able to use operational attributes
database.LDAPOpAttributesUsed=true
Synchronizing the users
The second section configures the synchronization.
The parameter synchro.Threaded indicates if the synchronization is manual or if it is automatic, launched regularly. The delay between each synchronization is defined in the file org/silverpeas/admin/admin.properties in the property AdminThreadedSynchroDelay.
The parameter synchro.timeStampVar indicates which attribute on the LDAP entries is used to check for modification the LDAP side.
# Synchro parameters
# ------------------
Ldap server attribute to check if the entry has been modified in the ldap.
synchro.timeStampVar=modifyTimestamp
#Set to true for a periodic synchronization
synchro.Threaded=false
Next, we need to configure which users we are going to synchronize, and how their attributes match the mandatory fields of Silverpeas users.
The selection of users is done through a LDAP fiter. Since it is not the purpose of this tutorial to learn such a filter, we will keep the field blank.
Silverpeas requires that a user must have a first and a last name, an external id (for synchronization purpose) and a login.
# Users data synchronization settings
# ---------------
users.ClassName=person
# Note : the filter MUST be put between parentheses.
#        there MUSTN'T have dummy parentheses levels ex : (&((Condition1))(Condition2)) will NOT works, (&(Condition1)(Condition2)) will works
# (&(mail=*)(objectCategory=CN=Person,CN=Schema,CN=Configuration,DC=TSTEXCHANGE))
users.Filter=
# Note : To make domains easiest to change, the Id must be set to the login field
#        It's not an obligation but it's very strongly advised
users.IdField=entryUUID
users.LoginField=cn
users.FirstNameField=givenName
users.LastNameField=sn
#Not mandatory
users.EmailField=mail
Synchronizing the groups
Next, are the groups synchronization parameters. It is almost the same as for users. We won't dwell into the parameters for now.
# Groups' settings
# ----------------
# Depends on implementation
groups.ClassName=groupOfNames
# Note : the filter MUST be put between parentheses.
#        there MUSTN'T have dummy parentheses levels ex : (&((Condition1))(Condition2)) will NOT works, (&(Condition1)(Condition2)) will works
# (&(objectCategory=CN=group,CN=Schema,CN=Configuration,DC=TSTEXCHANGE)(member=*))
groups.Filter=(member=*)
# Set the id Field to the 'cn' insteed of the DN to allow groups to move in the LDAP database
# Set to objectGUID to have a unique ID
groups.IdField=entryUUID


# Use org.silverpeas.core.admin.domain.driver.ldapdriver.LDAPGroupSubTree to access groups that are just node with users and sub-groups as sons
# Use org.silverpeas.core.admin.domain.driver.ldapdriver.LDAPGroupUniqueDescriptor to access groups that contains an attribute containing DN of all there sons
# Use org.silverpeas.core.admin.domain.driver.ldapdriver.LDAPGroupAllRoot to access groups that contains an attribute containing DN of all there sons AND to have ALL those groups at the root with all sub-users at the first level

groups.Type=org.silverpeas.core.admin.domain.driver.ldapdriver.LDAPGroupAllRoot

# For LDAPGroupUniqueDescriptor and LDAPGroupAllRoot only :
# ---------------------------------------------------------
# The field that contains the child's DNs
groups.MemberField=uniqueMember
# If groups.SpecificGroupsBaseDN is not set, database.LDAPUserBaseDN is used as root for searchs
groups.SpecificGroupsBaseDN=ou=silverpeas,dc=example,dc=com

# For LDAPGroupAllRoot only :
# ---------------------------
# ONLY PUT THIS VALUE TO TRUE FOR THE FIRST TIME THE SYNCHRO IS DONE WITH THE 'ALL ROOT' MODEL
# This inherit the profiles from parent groups to child groups
groups.InheritProfiles=false

# For LDAPGroupSubTree only :
# ---------------------------
groups.IncludeEmptyGroups=true

groups.NameField=cn
groups.DescriptionField=description
Getting users attributes
Most of the time, the users information are stored in the LDAP directory. So we have to define which are the attributes we are interested in obtaining from it. You can define as many attributes as you want. This attributes won't be stored in Silverpeas database. It will be getting from your directory on-demand.
First, you have to define the number of attributes (property.Number) and the resources where Silverpeas will get the multilang labels for the user attributes using property.ResourceFile.
For each attribute, you will provide :
- property_#.Name: which is the name of the property in the resource bundle.
- property_#.Type: the type of the property (only STRING and USERID are currently supported).
- property_#.MapParameter: the name of the attribute in the LDAP entry.
In our example, we want to get the email address, the city and the postal code
# USERS Specific Properties
# -------------------------

# Property number : from 1 to N
# Available Types : STRING, USERID
# MapParameter : Name of the LDAP corresponding field

property.Number = 3
property.ResourceFile = org.silverpeas.domains.multilang.domainOpenDJBundle

property_1.Name = email
property_1.Type = STRING
property_1.MapParameter = mail

property_2.Name = city
property_2.Type = STRING
property_2.MapParameter = l

property_3.Name = postal_code
property_3.Type = STRING
property_3.MapParameter = postalCode
All these parameters need to be internationalized, thus we will use the resource bundle defined in the previous entry: org.silverpeas.domains.multilang.domainOpenDJBundle
which is $SILVERPEAS_HOME/properties/org/silverpeas/domains/multilang/domainOpenDJBundle_$lang.properties
Configuring the domain for authentication
Now we need to tell Silverpeas to use this domain for authentication. This is a little redundant and we hope to simplifiy this in the future.
This configuration is done with the $SILVERPEAS_HOME/properties/org/silverpeas/authentication/autDomainOpenDJ.properties where you will find the connection parameters for the authentication module.
# Fallback type : could be one of the following values : none, ifNotRejected, always
fallbackType=always

# Authentication servers
# Available types are :
#     org.silverpeas.authentication.AuthenticationNT
#     org.silverpeas.authentication.AuthenticationSQL
#     org.silverpeas.authentication.AuthenticationLDAP
allowPasswordChange=false

autServersCount=1

autServer0.type=org.silverpeas.authentication.AuthenticationLDAP
autServer0.enabled=true
autServer0.LDAPHost=localhost
autServer0.LDAPPort=1389
# if you are using MS Active Directory, set 'ad' on parameter below
autServer0.LDAPImpl=opends
autServer0.LDAPAccessLogin=cn=Directory Manager,cn=Root DNs,cn=config
autServer0.LDAPAccessPasswd=password
autServer0.LDAPUserBaseDN=ou=silverpeas,dc=example,dc=com
autServer0.LDAPUserLoginFieldName=uidw
autServer0.LDAPSecured=false
autServer0.LDAPSecuredPort=636
autServer0.MustAlertPasswordExpiration=false
Creating the domain
When Silverpeas has started, connect to it and go to the Back Office.
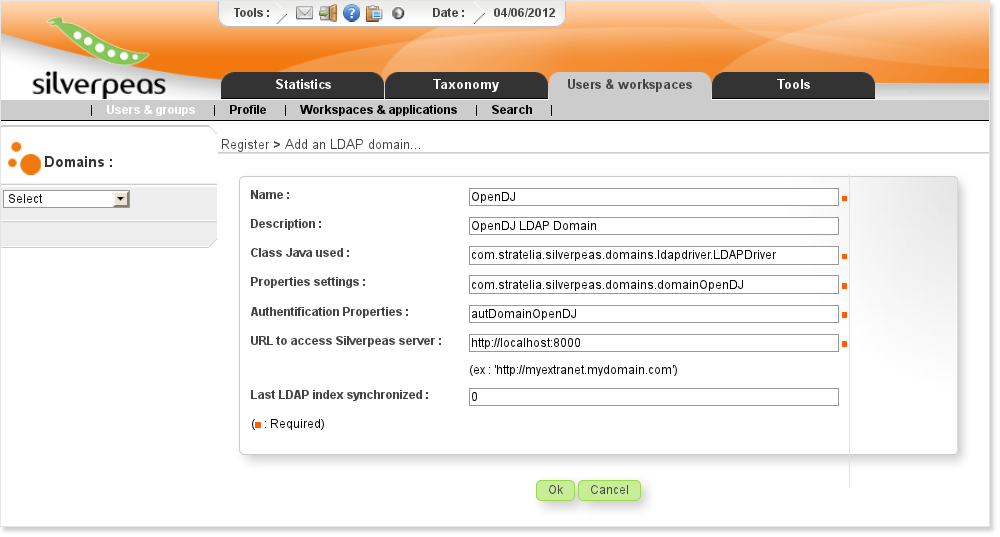
Select Users & groups, and click on the menu item Add an LDAP domain.
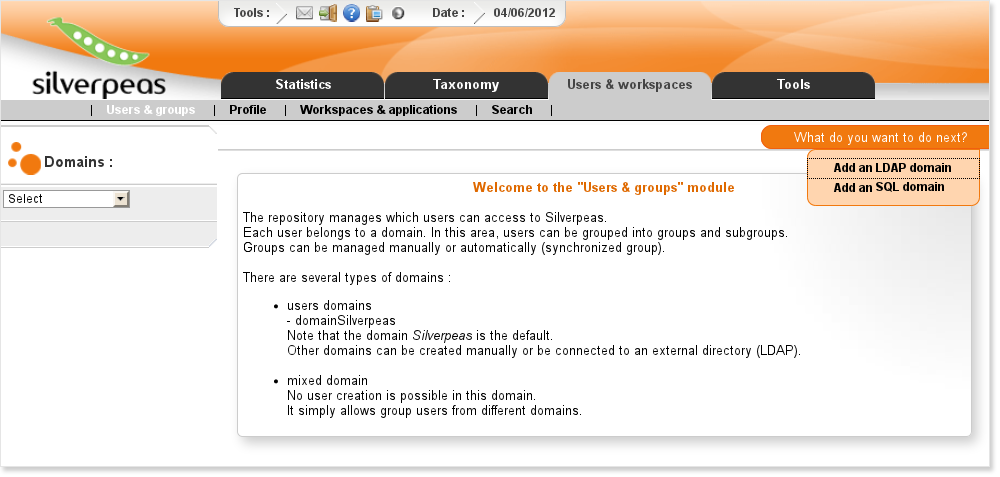
Now we need to fill the form for creating the domain.
While for the Properties Settings field you have to give the whole bundle name, in the Authentication Properties you just have to define the name of the file.
The field Last LDAP index synchronized is the timestamp of the latest synchronization. Per default, only users updated since this date will be synchronized.
In our example you can set it to 20100400000000Z.
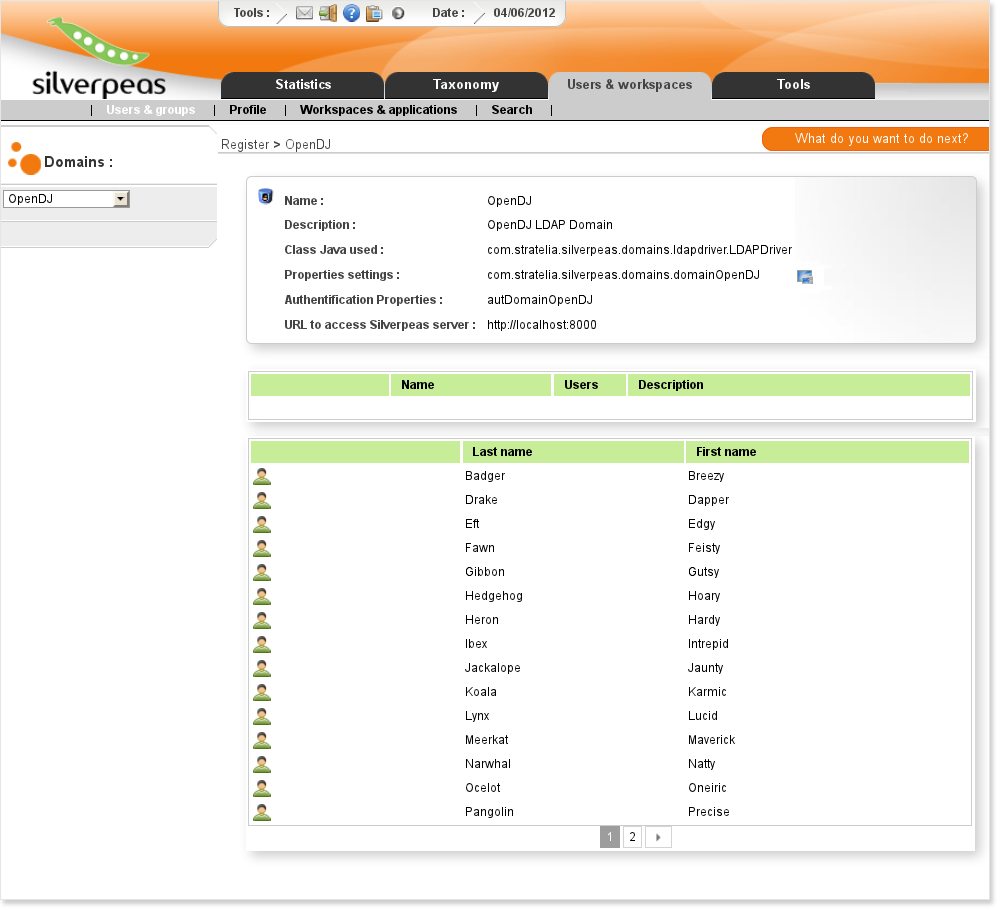
Launch the synchronization, you should have the following result:
The synchronization can be launch manually or you can synchronize periodically. This is done by editing the file $SILVERPEAS_HOME/properties/org/silverpeas/admin/admin.properties and defining the parameter DomainSynchroCron using a crontab value. For example :
DomainSynchroCron=45 6 * * *
